1. はじめに
Hugo は,ページネーションがテンプレートとして標準搭載されています。しかし,無限ページングのテンプレートは標準搭載されていないため,フルスクラッチで実装する必要があります。実装するに当たって (1) JavaScript を用いて実装する方法と (2) Hugo の機能で実装する方法が考えられます。(1) と (2) は,共にソースコードが公開されているので,公開されているソースコードを活用します。また,本記事内で行っている作業は,以下の環境下で実行したものです。
- Hugo Ver.0.75.1
- Zorin OS 15 Core (Ubuntu 18.04 LTS)
2. ソースコード
公開されているソースコードに手を加えたものを以下に示します。一般的な無限ページングは,JavaScript を用いて DOM を操作することで実現しています。しかし,公開されているソースコードは Hugo に標準搭載されているページネーションの機能を応用して擬似的な無限ページングを実現しています。
{{ $paginator := .Paginate .Pages }}{{ $pageSize := $paginator.PageSize }}{{ $totalPostsToShow := mul $paginator.PageNumber $pageSize }}{{ range $index, $el := (first $totalPostsToShow .Pages) }}<div {{ if eq $index (sub $totalPostsToShow $pageSize) }} id="bottom" {{ end }}> <a href="{{ .Permalink }}">{{ .Title }}</a></div>{{ end }}{{ if and (gt $paginator.TotalPages 1) ($paginator.HasNext) }}<a class="nextpage" href="{{ $paginator.Next.URL }}#bottom">More</a>{{ end }}3. 実行環境構築
hugoBasicExample をベースに,実行環境を構築します。まずは,GitHub のリポジトリから hugoBasicExample を任意のディレクトリにクローンし,./hugoBasicExample/layouts/_default ディレクトリ直下に section.html を作成します。
$ pwd$ /home/admin$ git clone https://github.com/gohugoio/hugoBasicExample.git$ cd hugoBasicExample$ mkdir ./layouts/_default/$ touch ./layouts/_default/section.html$ tree.├── LICENSE├── README.md├── config.toml├── configTaxo.toml├── content│ ├── _index.md│ ├── about.md│ ├── archives.md│ ├── homepage│ │ ├── about.md│ │ ├── index.md│ │ └── work.md│ └── post│ ├── _index.md│ ├── emoji-support.md│ ├── markdown-syntax.md│ ├── math-typesetting.md│ ├── placeholder-text.md│ └── rich-content.md├── layouts│ └── _default│ └── section.html└── static
10 directories, 18 files上記で作成した section.html を以下のソースコードに書き換えます。
<!doctype html><html lang="en"> <head> <meta charset="UTF-8" /> <meta name="viewport" content="width=device-width, initial-scale=1.0" /> <title>Document</title> </head>
<body> {{ $paginator := .Paginate .Pages }} {{ $pageSize := $paginator.PageSize }} {{ $totalPostsToShow := mul $paginator.PageNumber $pageSize }} {{ range $index, $el := (first $totalPostsToShow .Pages) }} <div {{ if eq $index (sub $totalPostsToShow $pageSize) }} id="bottom" {{ end }}> <a href="{{ .Permalink }}">{{ .Title }}</a> </div> {{ end }} {{ if and (gt $paginator.TotalPages 1) ($paginator.HasNext) }} <a class="nextpage" href="{{ $paginator.Next.URL }}#bottom">More</a> {{ end }} </body></html>4. 動作確認
hugoBasicExample ディレクトリ直下に移動し,hugo server を実行します。正常に実行されると,http://localhost:1313/ に Web サーバーが立ち上がります。しかし,http://localhost:1313/ にアクセスしても index.html を設置していないため,ブラウザ上には何も表示されません。section.html の内容を表示させるために,http://localhost:1313/post/ にアクセスします。
$ pwd$ /home/admin/hugoBasicExample$ hugo server
| EN-------------------+----- Pages | 19 Paginator pages | 1 Non-page files | 0 Static files | 1 Processed images | 0 Aliases | 10 Sitemaps | 1 Cleaned | 0
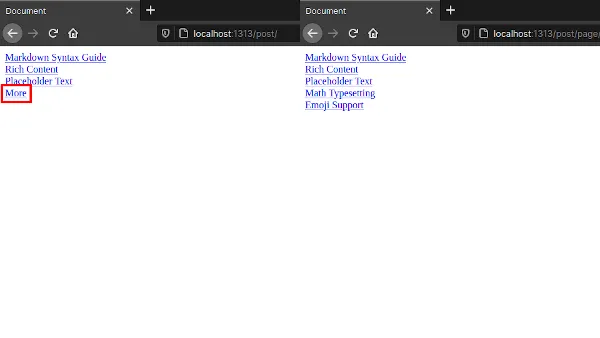
Built in 13 msWatching for changes in /home/admin/hugoBasicExample/{content,layouts,static}Watching for config changes in /home/admin/hugoBasicExample/config.tomlEnvironment: "development"Serving pages from memoryRunning in Fast Render Mode. For full rebuilds on change: hugo server --disableFastRenderWeb Server is available at http://localhost:1313/ (bind address 127.0.0.1)Press Ctrl+C to stopブラウザで http://localhost:1313/post/ にアクセスすると,ブラウザ上に 3 つの記事タイトルと More ボタンが表示されます。表示されている More ボタンをクリックすることで,新たに 2 つの記事タイトルが表示されれば正常に動作しています。
5. おわりに
ここまで,Hugo に標準搭載されている機能を用いて擬似的な無限スクロールを実装する手順について記述してきました。擬似的な無限スクロールですが,完全な無限ページングと比較しても機能的な差はなく,ストレスを感じるようなこともありませんでした。また,config.toml の paginate に設定されている数値を変更することで,表示される記事数を変更することが出来ます。