1. はじめに
Hugo には,assets ディレクトリ下に配置している CSS ファイルやメディアファイルなどのアセットを処理する Hugo Pipes が標準で実装されており,PostCSS も操作することも出来ます。また,Tailwind CSS をインストールする方法として Tailwind CLI や CDN を活用した方法の他,PostCSS のプラグインとしてインストールする方法があります。本記事では,これらの機能と特徴を活用して Hugo に Tailwind CSS をインストールする手順について記述します。
本記事で行っている作業は,以下の環境下で実行したものです。また,npm と Hugo はインストール済みの前提で記述しており,インストール手順は割愛していることをご了承ください
- npm Ver.6.14.11
- Hugo Ver.0.80.0
- Zorin OS 15 Core (Ubuntu 18.04 LTS)
2. 環境構築
(1) まず初めに,Hugo のテンプレートを生成します。(2) 次に,必要なファイルである index.html と style.css,postcss.config.js を作成します。(3) 最後に,必要なパッケージである tailwindcss と postcss-cli,autoprefixer をインストールします。Tailwind CSS のインストールガイドでは,postcss をインストールしていますが,Hugo Pipes では postcss-cli が必要なため注意が必要です。
# (1)$ hugo new site quickstart$ cd quickstart
# (2)$ mkdir assets$ touch assets/style.css$ touch layouts/index.html$ touch postcss.config.js
# (3)$ npm init -y$ npm install tailwindcss@latest postcss-cli@latest autoprefixer@latestHugo Pipes のドキュメントと Tailwind CSS のインストールガイド,Tailwind UI の CTA Sections を参考に,上記で作成した index.html と style.css,postcss.config.js を以下のように書き換えます。
<!DOCTYPE html><html lang="en">
<head> <link rel="stylesheet" href="{{ (resources.Get "style.css" | resources.PostCSS | minify | fingerprint).Permalink }}"> <meta charset="UTF-8"> <meta name="viewport" content="width=device-width, initial-scale=1.0"> <title>Hugo + Tailwind CSS</title></head>
<body> <!-- This example requires Tailwind CSS v2.0+ --> <div class="bg-gray-50"> <div class="max-w-7xl mx-auto py-12 px-4 sm:px-6 lg:py-16 lg:px-8 lg:flex lg:items-center lg:justify-between"> <h2 class="text-3xl font-extrabold tracking-tight text-gray-900 sm:text-4xl"> <span class="block">Ready to dive in?</span> <span class="block text-indigo-600">Start your free trial today.</span> </h2> <div class="mt-8 flex lg:mt-0 lg:flex-shrink-0"> <div class="inline-flex rounded-md shadow"> <a href="#" class="inline-flex items-center justify-center px-5 py-3 border border-transparent text-base font-medium rounded-md text-white bg-indigo-600 hover:bg-indigo-700"> Get started </a> </div> <div class="ml-3 inline-flex rounded-md shadow"> <a href="#" class="inline-flex items-center justify-center px-5 py-3 border border-transparent text-base font-medium rounded-md text-indigo-600 bg-white hover:bg-indigo-50"> Learn more </a> </div> </div> </div> </div></body>
</html>@tailwind base;@tailwind components;@tailwind utilities;module.exports = { plugins: { tailwindcss: {}, autoprefixer: {}, },}3. 動作確認
Hugo Serer を起動し,任意の Web ブラウザでアクセスします。以下のような画面が表示されれば正常にインストールが完了しています。また,Hugo Serer を起動する際に Tailwind CSS をビルドするため,バニラの状態と比較して Hugo Serer の起動に時間がかかります。
$ hugo server --gc --minify
| EN-------------------+----- Pages | 4 Paginator pages | 0 Non-page files | 0 Static files | 0 Processed images | 0 Aliases | 0 Sitemaps | 1 Cleaned | 0
Built in X msEnvironment: "development"Serving pages from memoryRunning in Fast Render Mode. For full rebuilds on change: hugo server --disableFastRenderWeb Server is available at http://localhost:1313/ (bind address 127.0.0.1)Press Ctrl+C to stop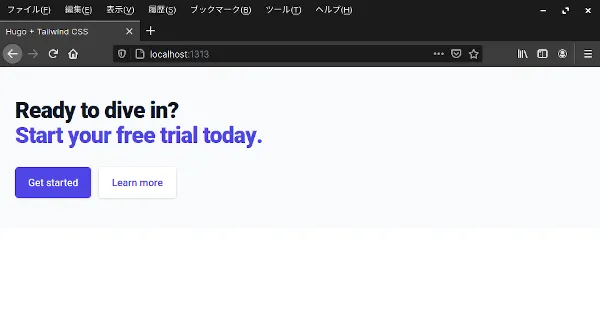
4. おわりに
ここまで,Hugo に Tailwind CSS をインストールする手順について記述してきました。本記事は,開発環境を想定した内容になっています。本番環境にデプロイする場合は,PurgeCSS の設定と NODE_ENV を production に設定することを,お忘れなく。