Tailwind CSS でフォームをカスタマイズする

1. はじめに
Tailwind CSS でフォームをカスタマイズする場合,input タグや select タグ,textarea タグなどのフォーム部品を直接カスタマイズすることも出来ますが,公式のプラグイン (tailwindcss-forms と tailwindcss-custom-forms) が公開されているので,プラグインを用いてカスタマイズする方法がオススメです。
tailwindcss-custom-forms は,フォーム要素にクラス名を記述する必要がありますが,tailwindcss-forms は,自動的にフォーム要素をカスタマイズしてくれます。また,Awesome Tailwind CSS でも,tailwindcss-custom-forms は非推奨に分類されているので,本記事では tailwindcss-forms を用いてフォームをカスタマイズする手順を記述します。
以降の章で行っている作業は,以下の環境下で実行したものです。また,npm や npx はインストール済みの前提で記述しており,インストール手順は割愛していることをご了承ください。
- npm Ver.6.14.9
- npx Ver.6.14.9
- Zorin OS 15.2 Core (Ubuntu 18.04 LTS)
2. 環境構築
(1) 動作確認用の index.html を生成します
(2) 初期化処理を行い package.json を生成します
(3) Tailwind CSS と tailwindcss-forms をインストールします
(4) Tailwind CSS の設定ファイルである tailwind.config.js を生成します
1$ touch index.html ・・・ (1)2$ npm init -y ・・・ (2)3$ npm install tailwindcss@latest @tailwindcss/forms ・・・ (3)4$ npx tailwindcss-cli@latest init ・・・ (4)5$ ls6index.html node_modules package-lock.json7package.json tailwind.config.js上記で生成した index.html と tailwind.config.js を,それぞれ以下のように書き換えます。
1<!doctype html>2<html lang="en">3  <head>4    <meta charset="UTF-8" />5    <meta name="viewport" content="width=device-width, initial-scale=1.0" />6    <title>Tailwind CSS Forms</title>7    <link href="tailwind.css" rel="stylesheet" />8  </head>9
10 <body>11 <form class="m-16 grid grid-cols-1 gap-6">12 <label class="block">13 <span class="text-gray-700">Full name</span>14 <input15 type="text"16 class="mt-1 block w-full rounded-md border-gray-300 shadow-sm focus:border-indigo-300 focus:ring focus:ring-indigo-200 focus:ring-opacity-50"17 placeholder=""18 />19 </label>20 <label class="block">21 <span class="text-gray-700">Email address</span>22 <input23 type="email"24 class="mt-1 block w-full rounded-md border-gray-300 shadow-sm focus:border-indigo-300 focus:ring focus:ring-indigo-200 focus:ring-opacity-50"25 placeholder="john@example.com"26 />27 </label>28 <label class="block">29 <span class="text-gray-700">When is your event?</span>30 <input31 type="date"32 class="mt-1 block w-full rounded-md border-gray-300 shadow-sm focus:border-indigo-300 focus:ring focus:ring-indigo-200 focus:ring-opacity-50"33 />34 </label>35 <label class="block">36 <span class="text-gray-700">What type of event is it?</span>37 <select38 class="mt-1 block w-full rounded-md border-gray-300 shadow-sm focus:border-indigo-300 focus:ring focus:ring-indigo-200 focus:ring-opacity-50"39 >40 <option>Corporate event</option>41 <option>Wedding</option>42 <option>Birthday</option>43 <option>Other</option>44 </select>45 </label>46 <label class="block">47 <span class="text-gray-700">Additional details</span>48 <textarea49 class="mt-1 block w-full rounded-md border-gray-300 shadow-sm focus:border-indigo-300 focus:ring focus:ring-indigo-200 focus:ring-opacity-50"50 rows="3"51 ></textarea>52 </label>53 <div class="block">54 <div class="mt-2">55 <div>56 <label class="inline-flex items-center">57 <input58 type="checkbox"59 class="rounded border-gray-300 text-indigo-600 shadow-sm focus:border-indigo-300 focus:ring focus:ring-indigo-200 focus:ring-opacity-50"60 checked=""61 />62 <span class="ml-2">Email me news and special offers</span>63 </label>64 </div>65 </div>66 </div>67 </form>68 </body>69</html>1module.exports = {2 purge: [],3 darkMode: false, // or 'media' or 'class'4 theme: {5 extend: {},6 },7 variants: {8 extend: {},9 },10 plugins: [require('@tailwindcss/forms')],11}最後に,ビルド処理を行い,tailwind.css が正常に生成されれば環境構築は完了です。
1$ npx tailwindcss-cli@latest build -o tailwind.css2
3   tailwindcss 2.0.24
5   🚀 Building from default CSS... (No input file provided)6
7   ✅ Finished in 3.58 s8   📦 Size: 3.75MB9   💾 Saved to tailwind.css10
11$ ls12index.html  node_modules  package-lock.json13package.json  tailwind.config.js  tailwind.css
3. 動作確認
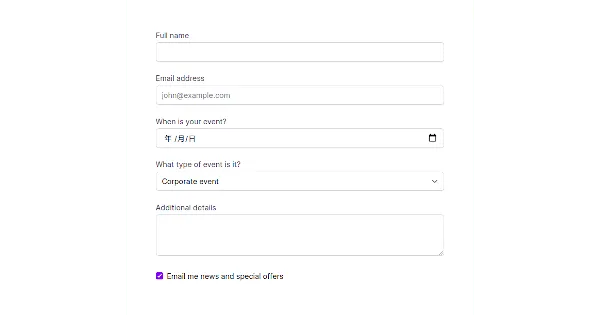
上記で生成した index.html を任意のブラウザで開き,以下のようにフォームがカスタマイズされていれば正常に動作しています。この他にも,様々なカスタマイズをすることが出来ます。詳しくは,tailwindcss-forms の README.md やライブデモを参照して下さい。
4. おわりに
ここまで,Tailwind CSS の公式プラグインである tailwindcss-forms を用いて,フォームをカスタマイズする手順について記述してきました。公式のプラグイン以外にも,有志の方々が開発,公開しているプラグインも存在するので,自分に合ったものを見つけて使ってみて下さい。